Introduction
Prequisites for this tutorial is knowledge in programming lanugage (C++98), basics about threading (see previous tutorials).
This tutorial shows you how to write wrapper classes for the thread functions. Not all aspects and options of threads are covered, just the basics.
Design
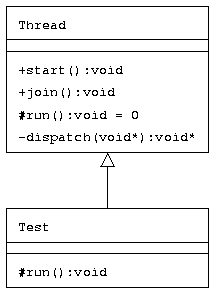
As you can see in the class diagram, the design is trivial.
Walkthrough
This chapter shows in-depth the source and explains their purpose and effect.
Thread Class
The main part of this tutorial is this class. The basic principle is to wrap the C API of the pthreads. First let’s have a look at important parts of the header file (class declaration):
class Thread
{
    private:
        pthread_t thread;
        static void * dispatch(void *);
    protected:
        virtual void run() = 0;
    public:
        virtual ~Thread();
        void start();
        void join();
};
That’s the complete interface we need to run a basic thread.
Now, let’s examine the implementation:
So far, so normal. The destructor has a default implementation, but has to be in place because of the pure virtual function, declared in the header file.
The most interesting and important method is dispatch. It starts the thread. It also calls the method run which will later contain the work which has to be done.
void * Thread::dispatch(void * ptr)
{
    if (!ptr) return 0;
    static_cast`<Thread *>`(ptr)->run();
    pthread_exit(ptr);
    return 0;
}
The two following method are just wrappers arround the well known API (see preliminary tutorials).
void Thread::start()
{
    pthread_create(&thread, 0, Thread::dispatch, this);
}

void Thread::join()
{
    pthread_join(thread, 0);
}
There is not really a difficult stage or complex code, very straight ahead.
Main Program
The inclusion of header files are not essential, for now. More interesting is the class Test, that inherits from Thread. It is our custom class for this tutorial. Have a look at the declaration:
class Test : public Thread
{
    private:
        std::string id;
    protected:
        virtual void run();
    public:
        Test(std::string id) : id(id) {}
};
The constructor has an inline implementation of a default constructor. It just initializes the attribute id.
More interesting, but still no challange is the method run. It goes through a loop and prints the initialized string onto the standard output.
The main program is even more boring. It creates the two objecs (threads), starts them and waits until they have finished. That’s all.
Compilation and Execution
Since this tutorial does not contain one single file, this chapter shows briefly how to compile and run the code. Don’t expect much explanation.
Compile and link the tutorial:
$ g++ -o thread.o -c thread.cpp
$ g++ -o tutorial5.o -c tutorial5.cpp
$ g++ -o tutorial5 tutorial5.o thread.o -lstdc++ -lpthread
Now run the program, as usual. Please note that the tutorial has no checks whether the operations worked or not, but nothing should go wrong.
Download Source Code
All source code files provided by this page is free to copy, modify, redistribute and use for any purpose. Use it on your own risk. The tutorial is copyrighted by Mario Konrad.
- thread.h / thread.cpp : The complete thread class.
- tutorial5.cpp : The main program and demonstration.